
Understanding the End-to-End Journey from URL to Rendered Storefront
When we talk about Shopify performance, most discussions focus on Lighthouse scores, image optimisation or JavaScript bundles.
Relatively few people take the time to understand what actually happens when a customer visits a Shopify page.
Every product page, collection page and landing page goes through a complex request lifecycle involving DNS resolution, CDN delivery, server-side Liquid rendering, browser processing and asset loading before the customer sees a fully interactive storefront.
For architects, developers and technical leaders, understanding this journey can help explain where performance bottlenecks originate, why certain optimisation techniques work, and where effort should be focused.
The High-Level Journey
At a simplified level, a Shopify page request follows this flow:
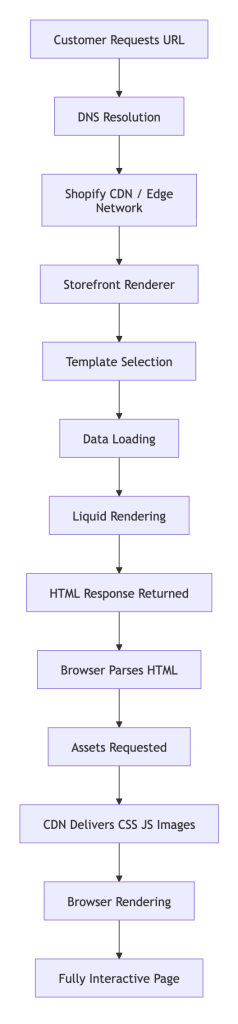
While this appears straight forward, a simple request has at least 13 layers to through; each stage contains multiple layers of processing.
Stage 1: DNS Resolution
Everything starts when a customer enters a URL or clicks a link.
Before Shopify can serve any content, the browser must determine where the website lives.
The browser performs:
- DNS lookup
- Connection establishment
- TLS negotiation
- HTTP/2 or HTTP/3 connection setup
Shopify’s platform documentation notes that storefront traffic is delivered through Shopify’s global CDN infrastructure, backed by Cloudflare, and uses modern protocols including HTTP/3 and TLS 1.3 to improve both performance and security. See more here: https://shopify.dev/docs/storefronts/themes/best-practices/performance/platform
This process typically completes in milliseconds, but geographical location, network quality and DNS configuration all influence the result, and downtime with Cloudflare means downtime for your site.
Stage 2: Request Reaches Shopify’s Edge
Once the connection is established, the request reaches Shopify’s edge infrastructure. The edge layer acts as the first point of contact for every storefront request and provides:
- Traffic routing
- Distributed delivery
- Cache management
- Compression
- Security controls
- DDoS protection
Shopify serves assets through its CDN using same-origin URLs under the store’s own domain. This avoids additional DNS lookups and connection overhead that can occur when assets are hosted separately.
For static assets such as:
- Images
- CSS
- JavaScript
- Fonts
The CDN may be able to serve content immediately without further processing. Dynamic storefront pages however require additional work.
Stage 3: Storefront Renderer Takes Over
For dynamic content, Shopify’s Storefront Renderer (SFR) processes the request.
Shopify describes Storefront Renderer as a dedicated server-side rendering system responsible for handling storefront requests as quickly as possible. This is where Shopify begins constructing the page.
The renderer must determine:
- Which page has been requested.
- Which template should be used.
- Which store data is required.
- Which sections and snippets need rendering.
Unlike client-heavy frameworks, most Shopify storefronts still generate their core HTML on the server.
This means customers receive a fully rendered document rather than a blank page waiting for JavaScript execution.
Stage 4: URL Routing
The renderer analyses the requested URL and identifies the associated resource.
For example:
/products/leather-walletbecomes:
/products/leather-walletwhile:
/collections/new-arrivalsbecomes:
Collection ResourceSimilarly:
/pages/about-us

/blogs/news

/search

/cart
all map to different resource types.
This routing process determines which data models and templates Shopify will use next.
Stage 5: Template Selection
Once Shopify knows the resource being requested, it identifies the appropriate template.
Modern Online Store 2.0 themes primarily use JSON templates.
Shopify’s architecture documentation explains that templates define which sections should appear on a page, while layouts provide the broader page structure around them. Eg;
product.jsonmay contain:
- Product Section
- Product Recommendations
- Recently Viewed Products
- FAQ Section
All configured in a merchant-editable structure. This flexibility is one of the major enhancements introduced by Online Store 2.0.
Stage 6: Data Loading
With the template selected, Shopify loads the necessary objects.
Depending on the page, this may include:
Product Pages
- Product data.
- Variants.
- Images.
- Metafields.
- Inventory availability.
Collection Pages
- Collection information.
- Product listings.
- Filters.
- Sort orders.
Global Objects
- Shop settings.
- Theme settings.
- Customer details.
- Locale information.
- Market configuration.
Shopify loads these objects before Liquid rendering begins. The amount of data requested here can have a direct impact on performance. Stores with large numbers of metafields, excessive looping, or overly complex rendering logic often experience increased server-side render times.
Stage 7: Liquid Rendering
This is where the magic happens.
Liquid is Shopify’s server-side templating language.
The rendering engine combines the following into a complete HTML document.:
- Templates.
- Sections.
- Blocks.
- Snippets.
- Shopify data objects.
Shopify’s theme architecture consists of the following which all participate in generating the final page.:
- Layouts.
- Templates.
- Section Groups.
- Sections.
- Blocks.
- Snippets.
For example:
{% render 'product-card', product: product %}renders reusable snippet content into the page. Shopify’s render tag is specifically designed to generate snippets safely and consistently during server-side rendering.
At this stage the customer still hasn’t received any HTML.
Everything is happening inside Shopify’s infrastructure.
Stage 8: HTML Response Sent to Browser
After rendering completes, Shopify returns the generated HTML.
This response contains:
- Fully rendered markup.
- CSS references.
- JavaScript references.
- Image URLs.
- Metadata.
- Structured data.
- Analytics integrations / 3rd Party Scripts.
The faster Shopify can complete rendering, the lower the Time To First Byte (TTFB).
This is why inefficient Liquid logic can become a performance issue. Liquid executes before the HTML reaches the browser, meaning poor server-side implementation increases wait time for every visitor.
Stage 9: Browser Parsing Begins
Once HTML arrives, the browser begins creating:
The DOM
A representation of the page structure.
The CSSOM
A representation of all styling rules.
The browser then starts assembling the Render Tree. At this point the page may begin appearing on screen before all assets have completed loading. This perceived performance is often more important than total page load time.
Stage 10: Asset Requests
The browser discovers additional resources and requests them.
Common examples include:
- CSS files.
- JavaScript bundles.
- Fonts.
- Product imagery.
- Videos.
- Third-party tags.
Most of these assets are delivered directly from Shopify’s CDN.
For imagery specifically, Shopify can dynamically:
- Resize images.
- Convert image formats.
- Compress assets.
- Deliver AVIF/WebP where supported.
This is one reason properly implemented Shopify themes can achieve excellent image performance.
Stage 11: JavaScript Execution
After downloading JavaScript assets, the browser begins execution.
This is often where performance challenges emerge.
Common offenders include:
- Search integrations.
- Review applications.
- Personalisation engines.
- Loyalty platforms.
- Analytics tools.
- Tag managers.
Many organisations spend significant effort optimising images while overlooking the impact of dozens of third-party scripts running simultaneously.
In practice, excessive JavaScript is often a larger source of performance degradation than Shopify itself.
Stage 12: Hydration and Customer Interaction
Modern Shopify themes now contain far more interactive components than traditional ecommerce platforms.
Examples include:
- Predictive search.
- Variant selection.
- Media galleries.
- Dynamic carts.
- Recommendation engines.
Once JavaScript completes execution, these elements become interactive.
The page is now considered fully usable.
Why This Matters
Understanding the Shopify page request lifecycle helps teams identify where performance problems actually originate.
A slow page could be caused by:
| Layer | Potential Issue |
|---|---|
| DNS | Poor domain configuration |
| CDN | Cache misses |
| Liquid Rendering | Heavy loops, excessive metafields |
| Data Layer | Over-fetching content |
| Images | Large unoptimised assets |
| JavaScript | Third-party app bloat |
| Browser | Render-blocking resources |
The key takeaway is that Shopify performance is rarely determined by a single factor.
A customer experiences the combined effect of:
- Network latency
- Platform performance
- Theme architecture
- Asset optimisation
- Third-party dependencies
- Browser execution
Conclusion
A Shopify page request is far more than a simple webpage download. Between the initial DNS lookup and the final interactive storefront, the request passes through Shopify’s global CDN, Storefront Renderer, theme architecture, Liquid rendering engine and browser rendering pipeline.
For technical teams, understanding this lifecycle provides a framework for diagnosing performance issues and making better architectural decisions. Whether you’re optimising Core Web Vitals, reducing TTFB, auditing app performance or redesigning a theme architecture, the most successful improvements come from understanding where time is actually being spent during the request journey.
Put simply: before you can optimise a Shopify storefront, you need to understand how Shopify builds it.
Image Credit: https://www.shopify.com/stock-photos/photos/person-holds-a-book-over-a-stack-and-turns-the-page
Comment or tweet @douglasradburn